How to maintain a gravel driveway
in the Willamette Valley.
By Jeff Walters · April 27, 2026 · 9 min read
The Willamette Valley gets 40+ inches of rain a year. That's hard on a gravel driveway, and it's why the same drive that lasts 25 years up the road can fail in 24 months down the road. The difference is rarely the rock. It's the bed, the crown, and what happens between the storms.
The two ways gravel drives fail
Every failed gravel driveway in the valley fails one of two ways: it loses its crown, or it loses its base. Sometimes both. Everything in this guide is built around preventing those two failures.
Crown is the slight peak in the middle of the drive that makes water shed to either side. A drive with crown sends water off and stays dry. A drive without crown — flat, or worse, dished — collects water in the middle, where the puddle softens the gravel until tires push it sideways. That sideways push is what creates ruts.
Base is the layer of crushed rock under the visible surface gravel. Without a proper base, every storm pushes water into the soil under the drive, the soil softens, the gravel migrates down into mud, and within a season or two there's no actual driveway left — just gravel-flecked mud on top of native soil. The drive looks fine until it doesn't, and then it's a regrade-from-scratch job.
What a properly built gravel drive looks like, in cross-section
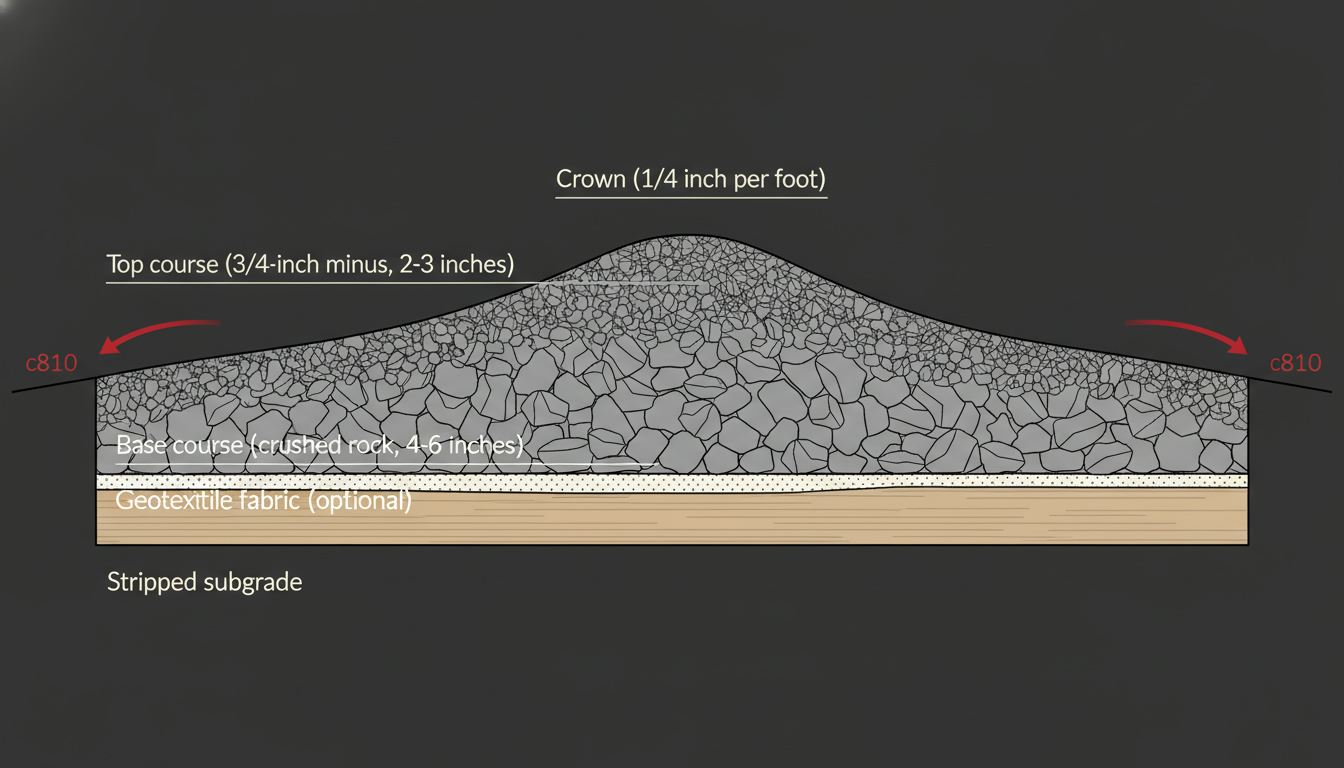
Bottom up, a gravel drive built to last in the valley has four layers:
- Stripped subgrade. Topsoil and any organic material removed (organic matter compresses and rots over time, creating soft spots). The bare native soil is shaped to a slight crown — the shape of the finished drive starts here.
- Geotextile fabric (sometimes). On soft ground, a layer of woven geotextile prevents the gravel above from migrating down into the mud below. Not always needed, but cheap insurance where the soil is questionable. In the valley, anywhere with heavy clay or seasonal wet ground is a candidate.
- Base course. 3" to 6" of crushed rock — typically 1.5" or 3" minus, depending on traffic load. This is the layer that actually carries weight. Compacted in lifts (multiple passes, not dumped at full thickness), it forms a stable platform.
- Top course. 2" to 3" of ¾-inch minus on top. The "minus" means the rock has fines (small particles) that lock together when compacted. ¾-inch minus is the valley standard for residential drives — clean (no-fines) rock looks pretty but never locks together and migrates fast.
Not sure what "3/4 minus" or "1.5 minus" looks like? See our rock and gravel size guide, where every size is compared to a quarter.
The whole stack is crowned about ¼ inch per foot — so a 12-foot-wide drive peaks roughly 1.5 inches higher in the middle than at the edges. That's the difference between a 25-year drive and a 5-year drive.
The maintenance calendar
A well-built drive doesn't need much maintenance, but it does need some. Here's the realistic calendar for a Willamette Valley driveway:
Yearly (every year, no exceptions)
- Walk it after the first heavy rain of fall. Look for puddles. Puddles are the canary — they show you where crown is failing or where drainage is plugged. Mark them mentally and watch them through the winter.
- Clear the roadside ditch and any culvert. The ditch and culvert next to your drive are the system that takes water away. Both fill with leaves, sediment, and grass over a season. A clogged ditch backs up onto the drive. A clogged culvert floods the entry. Five minutes with a shovel saves a lot of regret.
Every 2–3 years (depending on traffic and weather)
- Top-up with fresh rock. A thin layer (½" to 1") of fresh ¾-inch minus, regraded into the existing surface. This re-establishes crown, fills minor potholes, and replaces the surface fines that wash away gradually.
- Re-crown if needed. If the drive is going flat (no crown), the top-up has to be regraded with a box grader to actually rebuild the crown. Just dumping rock in low spots makes the puddle wider, not the drive better.
Every 5–10 years (sometimes longer, sometimes shorter)
- Heavier rescue. If the drive has lost its crown and the base is starting to mix with mud, it's a heavier intervention — strip the soft surface, add fresh base course, recrown, and top. This is the difference between a $1,500 maintenance call and a $5,000 rescue. The maintenance schedule above prevents most of these.
Mistakes that quietly destroy a driveway
Most failures we see come from one of these:
1. Driving on a soft drive after heavy rain
The single biggest accelerator of gravel drive failure. After 24+ hours of heavy rain, the surface is saturated. Driving on it pushes the wet gravel sideways, breaking up the surface. If you can wait an extra day after a big rain before driving on a marginal drive — wait. If you can't (and most of us can't), at least drive slowly. Speed is what does the damage.
2. Letting potholes get big before fixing them
A small pothole holds a small amount of water. A big pothole holds a big amount, and the next car through it pushes that water sideways under the surrounding gravel — undermining the base for several feet around the pothole. By the time the pothole is "really annoying," it's done damage to the bed underneath that can't be fixed by just filling the hole. Fix small potholes immediately. A wheelbarrow of ¾-minus and 10 minutes of tamping saves you from a regrade in 18 months.
3. Plowing in winter and scraping the surface
If you plow snow off your gravel drive, the plow blade scrapes the surface fines. After a few seasons of plowing, the drive has no fines left to lock the rock together — it just becomes loose gravel that migrates with every tire. Solution: keep the plow blade ½" to 1" off the surface, or use a snow shovel for the worst sections.
4. Not handling the runoff at the entrance
Where your drive meets the road is the biggest single point of failure on most rural valley properties. If the road's runoff drains down your drive entrance instead of into the roadside ditch, every storm is a flood at the entrance — washing the surface gravel out and undermining the bed. Often the fix is a properly sized culvert under the entrance or a regrade of the entrance to redirect water back into the ditch.
5. Letting weeds grow in the drive
Weeds are a symptom, not the disease — they tell you the drive's gone too long without a top-up and the surface is now soft enough to root. Killing the weeds doesn't fix anything. Top-up the drive with fresh ¾-minus and regrade it; the new layer will smother the weeds and restore the surface.
What to expect from a contractor when you call
If you've decided the drive needs work, here's how the conversation should go:
- The walk. The contractor walks the drive end to end. Looks at low spots, drainage at the entrance, ditch and culvert condition, base condition (visible at any potholes or low spots), surrounding slope.
- The diagnosis. "This drive needs a top-up and regrade" vs. "this drive is failing in the base and needs a heavier rescue" vs. "this is a brand-new install" — three different scopes, three different prices.
- The quote. Should be itemized: rock yardage, equipment time, drainage work if any, culvert work if any. A good quote tells you exactly what's being done, not just a single number.
- The work. A maintenance regrade for a typical 200–300 ft rural drive is a single-day job. A full rescue with new base is 2–3 days. New construction depends on length, but most are quoted as full-job projects.
- The walk-through. Drive should be walked together at the end. Crown should be visible. Edges should be feathered, not vertical. Rock should be locked, not loose.
Realistic costs in the Willamette Valley (2026)
For benchmark purposes — actual quotes vary by length, soil, access, and material costs:
- Top-up + regrade, short rural drive (~200 ft): $950–$1,500.
- Top-up + regrade, longer rural drive (300–500 ft): $1,800–$3,200.
- Rescue (failing base, multiple potholes, regrade plus base course): $3,000–$5,000+.
- New install: quoted per job — depends on length, base requirements, culvert needs.
If a quote is dramatically cheaper than these, ask what's not in it. Often the missing item is rock — they're regrading what's there but not adding new material, which buys you maybe a season before the same problems return.
The bottom line
A gravel driveway in the Willamette Valley should last 20+ years with reasonable maintenance — or fail in 3 with no maintenance. The difference is mostly:
- Crown. Maintain it. Rebuild it when it goes flat.
- Drainage. The ditch, the culvert, the entrance. Keep them clear.
- Top-up cadence. A modest yearly-ish refresh prevents the catastrophic 5-year regrade.
- Don't drive on it soft. Easier said than done in our climate.
If your drive is showing any of the warning signs — flat surface, returning potholes, mud where rock used to be, puddles after every rain — it's worth a walkthrough now rather than after the next big storm. See our gravel driveway page for the service-side details, or call and we'll come look at yours.
Drive starting to fail?
Photo helps a lot. Send a couple from the entrance and from the worst spot.